|
|
MeyerPlows.info |
|
|
|
MeyerPlows.info |
|
Updated 11-29-17
Checking And Changing Fluid in Meyer Plow Pumps
On this page - Checking the fluid level in Meyer snow plow pumps including, Meyer E-46, Meyer E-47, Meyer E-57, Meyer E-60, Meyer V-66, Meyer E-68, Meyer E-88, Meyer E-72, Meyer E-73, Meyer V-70, Meyer V-71. Where to check the level, how to check the level, how and where to add fluid.
This is how we do it. We know it works the best. With the E-46, E-47, E-57, it is OK to change the fluid with the unit on the truck, and better to take it off and change the fluid in a vise, but on the vehicle is OK. We will explain more about why later.
First get yourself a drain pan. I take my wife's old pots and pans to the shop, no sense in wasting them. You need a pan that will hold around 2 quarts minimum. Larger is better, as there is room for splashing and sloshing without making more of a mess...
Go in the vehicle and turn the ignition on. Walk
back around front, and manually push the Lift Arm ALL THE WAY DOWN. Go back
inside the vehicle and turn the key off. Use a 5/8" open end wrench to remove
the Fill Plug / Vent Plug, and Bushing. The Bushing is 5/8" and the Vent in it
is 7/16". It is a little easier putting new fluid in with the whole thing
removed rather than the tiny hole in the Bushing that the Vent screws into.
Removing the Vent will allow the fluid to flow out without "glugging" and making a mess. We have a cheap wrench that we ground down the box end thinner to easily fit over the bushing. IF you do not sacrifice a cheap wrench, it can be very difficult to remove the plug (bushing) from the top cap. Do yourself a favor and sacrifice a 5/8" wrench!

The wrench in the top of the pic is a "normal" wrench, the bottom one is ground thinner.
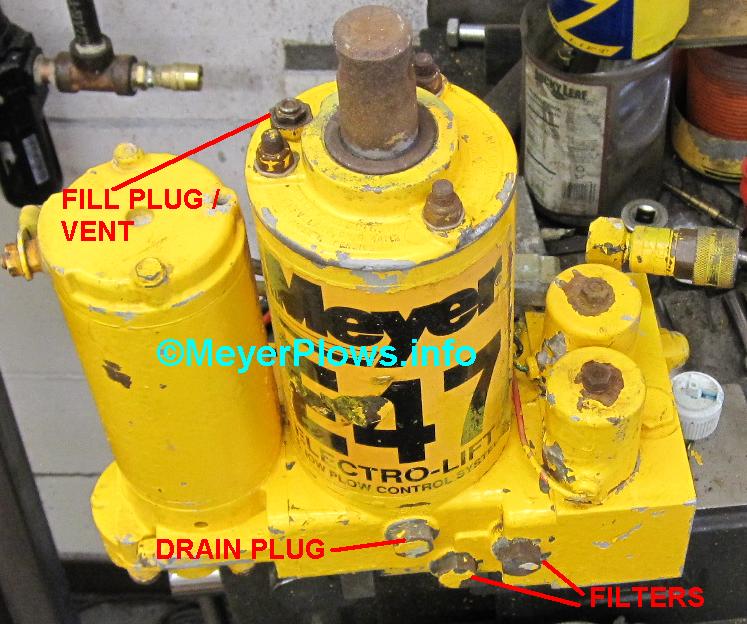
You can see in the above Meyer E-47 picture that there is a Drain Plug. Early E-47 units did not have Drain Plugs. IF yours has a Drain Plug, skip the next paragraph. You can also see the common mistake in the above pic that the Top Cap Wiper seal was installed upside down....
IF yours does not have a drain plug, the only way (short of disassembling the unit) to get the fluid out is through the fill hole. First disconnect the power wire to the motor, and the ground wire to the back of the unit. Unplug your 3 coil wires (red, green, black). Next you will want to remove the 5/8" bolt that holds the pump to the Lift Arm. Now you can tip the pump down over your drain pan. In this case, the fluid will "glug" while coming out. There is less than a quart of fluid in the unit. IF it is an H Model, there will be about 1 quart in it to drain.
Loosen the Drain Plug using an 11/16" box end wrench or socket (some early units you will need a 5/8" wrench or socket). You may have to screw it back in and then out a few times to break the O Ring free. Take your time, and do not tear the O Ring. Once you can turn it with your fingers, get the drain pan ready, and slowly remove the Drain Plug. The fluid will drain quick. then slow to a trickle, and you will see the black gunk flow out, and any water that has not mixed with the fluid. IF you have the unit in a vise, you can tip it forward more to drain even more out. Then remove the two Filter Plugs and Filters. Clean the filters with kerosene, and gently blow them out with compressed air if you can. The Filter on the right in the picture is the High Pressure Filter. That means when the fluid leaves to pump, it must first pass through the High Pressure Filter before it gets to where it is going. There will not be any pressure behind the Plug when you go to remove it.
IF the fluid looks milky, or a lot of water comes out, then the source of the water contamination needs to be found and corrected or you will be left stranded when you need the unit the most. Better to take care of it now rather than later. The main sources of contamination are the Couplers (are they leaking fluid?) and the chrome on the Lift Ram, and Angle Rams. If they are rusted and pitted, the pits pull water into the system when using the plow. You will never win the battle with moisture, they need to be replaced, period. Remember where fluid leaks out, water often gets sucked in too. Having the unit rebuilt or rebuilding it yourself (if you are confident you can do it) is a good idea when water is found. If there is no pitting, a Basic Seal Kit will often solve your water problem. IF you have signs of water, the Angle Rams MUST be flushed too. More on that later...
Next is additional steps you can take to get even more gunk out of the unit, which is why you are changing the fluid to begin with. Put the Drain Plug back in finger tight. Put about a third of a quart of Meyer M2 Hydra-Flush into the fill hole (or Kerosene if you have it). Let the unit sit for 15 minutes or so. DO NOT RUN THE UNIT WITH FLUSH OR KEROSENE IN IT. I don't care what anyone says, there is no benefit to it. You want to dissolve the gunk, and get it out, not dissolve it and send it through the system! IF the unit is off the truck, put the fill plug back in hand tight, and give the unit a good shake. This will help break up the gunk in the bottom where it is all settled and adhered inside the unit. Get your drain pan and remove the fill plug and then Drain Plug again. Even more gunk will come out. If it is chunky and there is lots of it, repeat the fill sit, and shake as many times until it seems to be coming out clean. If you have access to a compressor, use a blow gun with a rubber tip firmly inserted into the fill hole, and a rag held loosely over the Drain Hole, and CAREFULLY, GENTLY blow air into the unit. This will push out more gunk. Repeat two more times, finishing the bottle of Hydra-Flush. Any remnants of Hydra-Flush in the system will not harm it (nor will Kerosene). Put the Drain Plug back in, and torque it to 65 - 75 INCH Pounds. Put the Filters and Filter Plugs back in, and torque them to 65 - 75 INCH pounds. Refill the unit with Fluid. Use a zip tie, or bent piece of wire, or a popsicle stick as a dipstick. You want the fluid to be about 1.5" below the top with the Lift ram pushed all the way down (which it still should be from when you took it off the truck, or lowered it on the truck).
Common Problems we find when rebuilding Meyer E-47 units. Now is a good time to check this article out, because you will be up close and personal with your E-47 while changing the fluid. You may be able to avoid some headaches when the snow is flying by taking care of any problems now.
Meyer E-60 / E-60H

The E-60 is a little different. For whatever reason, the Drain Plug is right in the center of the bottom of the unit. When it is on the vehicle, it is tilted forward. Removing the Drain Plug will not get all the gunk out. This is why it is best to remove the E-60 from the vehicle and change the fluid in a vise. See the picture below.

You can see how all the gunk settled to the left inside the unit in the picture. That is where it is level when the E-60 is mounted on the vehicle. Also, up near the Lift Cylinder base is a step, or ledge where even more crap sits. To be honest, taking the the Motor and Side Cover (Motor Mounting Plate) off is the best way to clean out an E-60, but upright in a vise is the next best way.
Follow the steps outlined for the E-47 unit
above. Remove the Vent/Fill Plug, then the Drain Plug. The difference is that
you will need a 1/4" Allen Wrench to remove the Drain Plug on the E-60. Another
reason to remove the E-60 from the vehicle is that there is a Filter Plug on the
back of the unit. It is typically not easy to get to when mounted on the
vehicle. The other Filter Plug is on the front of the unit. There will be what
looks like two Filter Plugs on the front. The one on the left is NOT a Filter,
it is the Drop Speed Adjusting Screw. The one on the right is the other Filter.
Follow the steps for the E-47 above to flush and blow out the inside of the
unit. Refill as outlined above. The difference is that the E-60 holds over a
quart of fluid, and the H Model holds almost 2 quarts. Better use the larger
drain pan I mentioned above.


Meyer E-58H
The E-58H is the same as the E-47 and E-57, except there is no lower Filter on the front. This is because the A Valve has been moved to the PA Block, and so has the Filter. It is on the bottom of the PA Block:

Some of the early E-58H units had the filter in the lower port on the front in addition to the one in the bottom of the PA Block. IF you find a filter on the front, remove it and save it as a spare for the High Pressure Filter (the higher one on the front). There is no reason to have two filters.

Meyer E-72
This is the E-72. The procedure to check the level is the same as all the other Meyer straight plow hydraulic units. Put the plow in float, push the Lift Arm all the way down by hand, and then check the level. It is much easier to see the level in the E-72, V-70, and V-71 since the tank is plastic, you don't even need tools to check it. Right on the tank is a fill line. It may be hard to see, but it is there on both sides of the tank. I use a Sharpie to highlight the line on all the installs I do. The fill plug is finger tight, then just a hair more. You don't want to strip the plastic threads! Later units actually have a yellow plastic plug instead of the steel one pictured. They are even easier to strip.
The V Plow Bucher (Monarch) hydraulic units, V-70, and V-71 both wings need to be folded back (V Position), then the Lift Arm needs to be pushed all the way down by hand, and then you can check the fluid level. Like the straight plow Bucher units, they have a plastic tank with the fill line marked on them like the E-72 pictured above. Early V-70 units had a steel tank, in that case, the fluid should be to the bottom of the threads of the fill hole.

Meyer E-73 SOS
The Meyer E-73 is used with the SOS (Standard Operating System) plows. It is a Bucher unit. The fluid tank is turned sideways. The correct level is about 2/3 full.
IF you only drain the hydraulic unit you are
still leaving dirty, contaminated fluid in your Power Angle Rams. We put a
couple of videos up on You Tube to show how to flush your Power Angle Rams.
Video -
Flush Angle Rams Part 1
Parts You May Need
Links to our other sites: www.SmithBrothersServices.com
- Meyer Snow Plow Specialists in Northern New Jersey. We rebuild pumps.
We stock and sell new and used Meyer parts.
www.SmithBrothersPlowParts.com - The BEST place to
get any Meyer Snow Plow Parts you could possibly need, at a good price, with
superior service, and free tech help! We have every part that Meyer offers
available for purchase, including some obsolete parts. We also carry many
aftermarket snow plow parts. We ship smaller
parts US Priority Mail so you save on shipping, plus get your parts fast, and
larger heavier parts via UPS. The nice thing about US Priority Mail is they
deliver on Saturdays at no extra cost to you. www.LetsTalkSnow.com/forums - Discussion
Forums for those who plow snow.
www.Snowplowing-Contractors.com - Educational Resources for Snow & Ice
Professionals, including a Directory of Snow Plowing Contractors from all over
the US and Canada. HUGE Meyer Plow Tech area. Celebrating our 10th Anniversary
this year! www.ChucksChevyTruckPages.com
- EXCELLENT resource for info and tech/specs on 73 - 87 Chevy and GMC pickups,
Blazers, Jimmy, and Suburbans. Online since 1998 currently celebrating our 12
year anniversary! www.PlowPump.info - Technical help and resources for all plow pumps here.
We will add more as time allows. MeyerST.com - Moldboard Part Diagrams.
Sector and A Frame part Diagrams. They can be ordered from Smith Brothers Services.
MeyerE-47.com - Exploded views, info and
parts lists for E-47 units, including all common variations over the years.
MeyerE-57.com - Exploded views, info and
parts lists for E-57 units.
MeyerE-58H.com - Exploded views,
info and parts lists for E-58H units.
MeyerE-60.com - Exploded views, info and
parts lists for E-60 units, including all common variations.
MeyerDrivePro.com - Information on
the Meyer Drive Pro. Including the Drive Pro 6'8" that is perfect for Jeeps,
Tacomas, and other small vehicles, and the larger Drive Pro '6" that is for 1/2
ton trucks.
MeyerLotPro.com - This is the current
commercial plow line from Meyer. The Lot Pro is available in sizes from 7.5 - 10
feet wide.
MeyerRoadPro.com - The Road Pro
replaced the HM and Aggressor Series.
Home-Plow-By-Meyer.com - All
NEW (July 2010) plow built by Meyer for homeowner
use. Fits any vehicle with a front receiver hitch! Shipped right to your door.
_____________________________________________________________________________________________________ AUTHORIZED MEYER FULL LINE DISTRIBUTOR Smith Brothers
Services, LLC (973) 209-PLOW Entire site Copyright 2017 Smith Brothers
Services, LLC All Rights Reserved
Entire site Copyright 2013 Smith Brothers
Services, LLC All Rights Reserved Our Other Sites:
11/29/2017 11:31:33 PM
Common Misspellings: Meyers, Mayer, Mayers, Myer, Myers, Maier, Maiers.

Video -
Flush Angle Rams - Part 2
 SKU: M15254
 SKU: SBSULTIMATE
 SKU: M15456
 SKU: M15707
 SKU: M15692
 SKU: M15707
![]()
 SKU: SBS60-ULTIMATE
![]()
 SKU: M15619
 SKU: M15686
 SKU: M21999
 SKU: M21827
 SKU: M15682
 SKU: SBSVent
 SKU: M22129
 SKU: M15901
![]()
 SKU: M15902case
![]()
 SKU: M15487CASE
![]()
 SKU: M15134
3212 State Route 94
Suite 9
Franklin, NJ 07416
(973) 209-7569


Author: Chuck
Smith
Snowplowing-Contractors.com
SmithBrothersTruckParts.com
ChucksChevyTruckPages.com
SmithBrothersPlowParts.com MeyerST.com
MeyerPlowHelp.com MeyerPlows.info
PlowPump.info
MeyerPlowPumpParts.com
Home-Plow-By-Meyer.com
MeyerE-57.com
MeyerE-60.com
MeyerE-58H.com
MeyerDrivePro.com
MeyerLotPro.com
MeyerE-47.com
MeyerRoadPro.com
MeyerPathPro.com
MeyerVPlow.com
MeyerE-72.com Smith
Brothers Services on
YouTube
Author: Chuck Smith