|
MeyerPlows.info |
Added 1-22-17
Mechanical Binding?
Mechanical Binding is mentioned (not using the term,
but it is what it means) in the Meyer plow troubleshooting flow
chart. The problem is that
unless something is bent or very "off" the plow will not bind when you PULL it
side to side.
The troubleshooting flow chart for "Plow willl not
angle left" says:
1. "Can the snow plow be angled by hand when the PA
Rams are disconnected from the A Frame?"
If YES
2. "Will the snow plow angle right and left if not
allowed to travel to extreme angle position?"
if YES
3. "Temporarily put 1/2" blocks between Sector andA
Frame to limit the degree of angle. Will the snow plow now
angle?"
If YES
4. "Weld 1-1/2" x 1-1/2" x 1/2" spacers to the A Frame
stops."
The problem with 1 above is that we just couple the PA
Rams together and see if we can move the plow by hand. This
is because once a plow is
experiencing mechanical binding the bolts holding the PA Rams on are not likely
coming out
without a
cutting torch. So we pull the plow side to side. It is not the same as the PA
Ram pushing in a specific place on
the Sector (the front bolt). So the result is the plow
does not bind. Even if we cut the bolts off, and removed the PA
Rams, the plow will not bind.
Again, because we are not pushing on that specific point to move the blade. The
picture below is not perfect, or to scale but you get the idea.
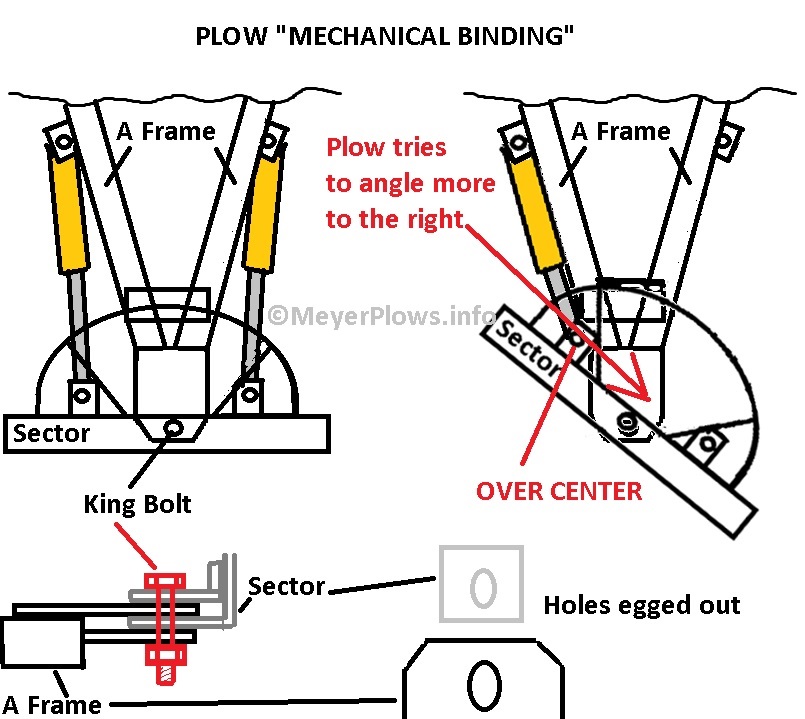
However, as you pull and push the plow, IF you look at that specific point, you
may notice the PA Ram going "over
center". In this case, when force is applied to the
front bolt, the plow is trying to angle MORE to the side it is already
angled to. This is because the
(angle of) PA Ram is over the center point, and it cannot extend more in the
direction it is
trying
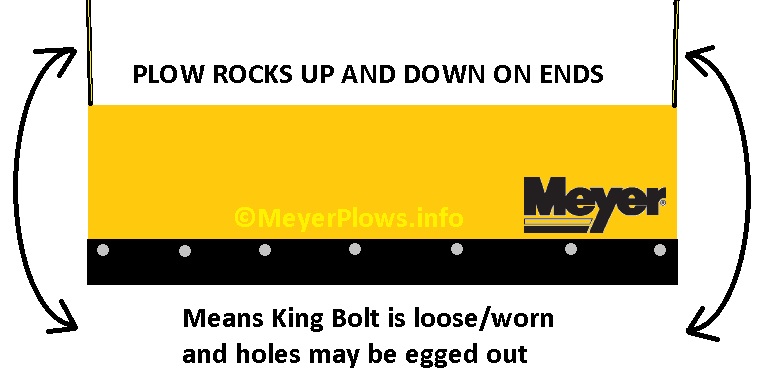
to go. As you move the plow back and forth by hand, look at the King Bolt. IF it
is rocking, spinning, or wobbling,
you likely have excessive wear to deal with. (Another
indication is if you raise the plow, go to one end and push down on
the top of the plow, it will
rock up and down a few inches, sometimes as much as 6").This can happen going
right or left,
it is
not specific to one side. Why does it happen?
Geometry. The plow is designed to pivot back and forth on the King Bolt. The PA
Rams extend and retract pivoting on
the front and back bolts. The back bolt holds the PA
Ram to the A Frame, and the front bolt holds the PA Ram (live end)
to the Sector. The King Bolt
passes through two holes in the Sector, and two holes in the A Frame. It is a
"knife" hinge
essentially. When these holes (in the Sector and A Frame) get worn, and even
egged out (oval shaped) instead of
round, this changes the geometry. Because in addition
to pivoting at this point, the Sector can oscilate. This oscelation
allows the Sector to move in
addition to just pivoting on the King Bolt, which in turn allows the live end of
the PA Ram to
go over
center. So once it is over center, it is tryingto angle MORE in the same
direction as it extends instead of the
opposite direction. So the plow gets stuck to one
side.
The fix is to remove the King Bolt (you will likely
need a torch), and weld the 4 holes round again. HOW you weld them
round matters as well. IF you
weld them wrong, in addition to not being able to get the bolt through the 4
holes, you can
change
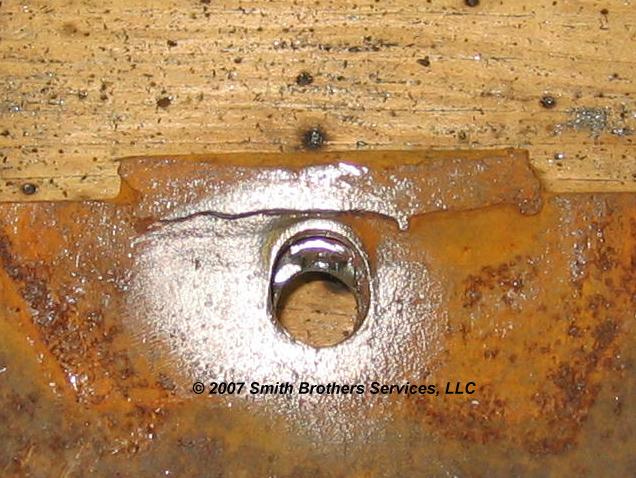
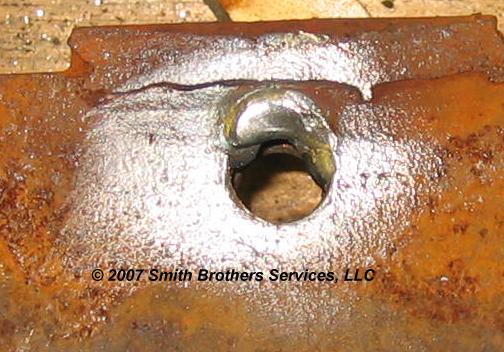
the geometry instead of putting it back to where it was designed to be. In the
pictures below, the Sector is upside down.

As you
move the plow back and forth by hand, look at the King Bolt. IF it is rocking,
spinning, or wobbling, you likely
have excessive wear to deal with. Another indication
is if you raise the plow, go to one end and push down on the top
ofthe plow, it will rock up
and down a few inches, sometimes as much as 6". Once a King Bolt has been beat
on and hammered by being left loose for so long, you can rarely tighten it, or
even loosen the nut without a torch.
As originally designed, the
Sector rides under the "Sector Release Bracket" as it angles from side to side.
When the
plow is
straight, the Sector should be almost all the way under, touching the back of
the Sector Release Bracket. If it is
more towards the front, or partially out from under
the Sector Release Bracket, failure is close. In addition to the hole
being egged out, the hole in
the top nosepiece is likely cracked and spread open. This is one way you can
look at a
plow and know
how hard it was used, the position of the Sector in relation to the Sector
Release Bracket.

Back
to "IF you weld them wrong".... The object is to put the Sector and A Frame
Sector Release Bracket back to their
original position (Sector under the Sector Release
Bracket). I added a "Reference Line" to illustrate what would happen
if you welded it wrong. You
would move it more out from under the Sector Release Bracket.

The King Bolt is installed
from the bottom up, that is correct. It will not magically fall out, the nylock
nut will not let that
happen. Anyone who thinks theirs fell out, had sloppy holes in the Sector and A
Frame and the bolt finally sheared.
You can install it from the
top, but you will have to loosen ALL of the Trip Spring Eyes and tilt the plow
forward. You will
have
to do the same to remove or replace the King Bolt, after the Trip Spring Eyes
have been rusting in place for years.
IF it is installed from the bottom, it can be replaced
without loosening the Trip Spring Eyes.
The problem with the fix in
the Meyer Troubleshooting (#4 above) is that yes, it will stop the plow from
getting stuck, but
it
will not fix the real problem, it will allow the holes to get worse until the
plow breaks in two.
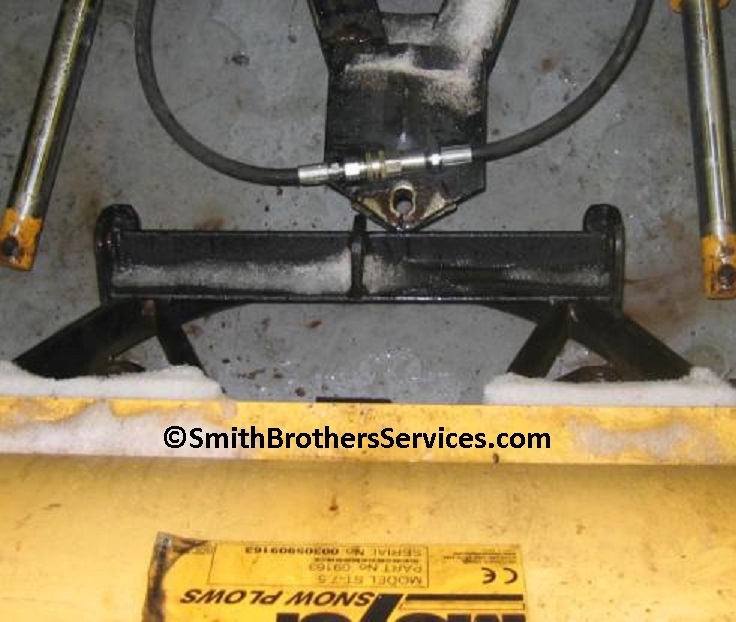
Here is a Meyer ST Series cracked Nosepiece, and
the repair.
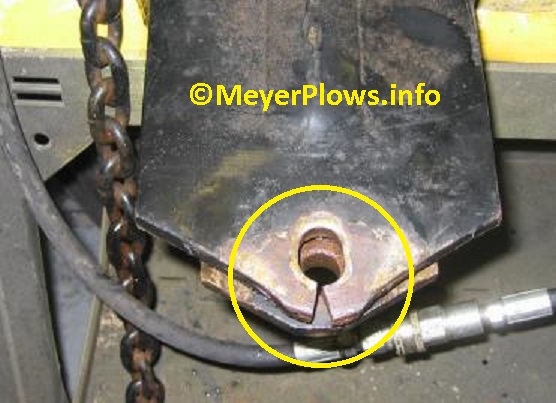
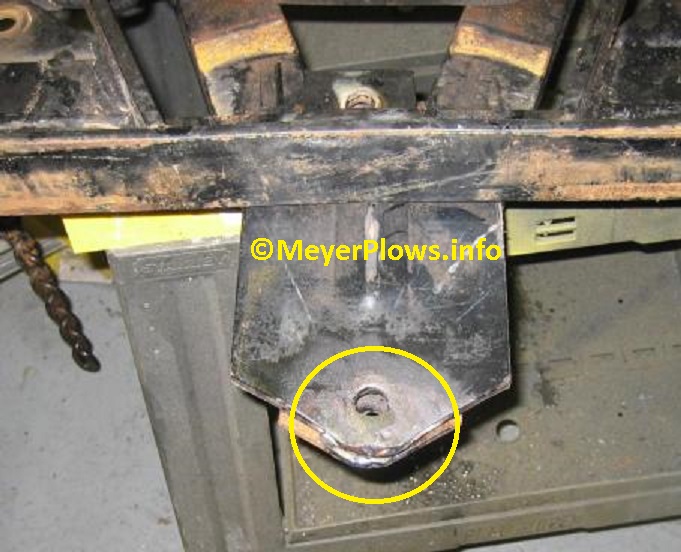
Here is another Nosepiece that was caught before catastrophic failure.

How does the hole get egged out in the first place? MeyerPlowHelp.com - Post
_____________________________________________________________________________________________________
AUTHORIZED MEYER FULL LINE DISTRIBUTOR
 |
Smith Brothers
Services, LLC |
 |


|
Become a Fan of Smith Brothers Services on Facebook for up to the minute info! |
Entire site Copyright 2017 Smith Brothers Services, LLC All Rights Reserved
Our Other Sites:
Snowplowing-Contractors.com
ChucksChevyTruckPages.com
SmithBrothersPlowParts.com
SmithBrothersServices.com
MeyerPlowHelp.com MeyerST.com
PlowPump.info
MeyerPlowPumpParts.com
Home-Plow-By-Meyer.com MeyerE-57.com
MeyerE-60.com
MeyerDrivePro.com
MeyerPlows.info MeyerLotPro.com
MeyerE-47.com
MeyerRoadPro.com
SmithBrothersTruckParts.com
MeyerE-58H.com MeyerPathPro.com
MeyerVPlow.com
MeyerE-72.com
Smith
Brothers Services on
YouTube MeyerE-68.com
Author: Chuck Smith
Common Misspellings: Meyers, Mayer, Mayers, Myer, Myers, Maier, Maiers, Meijer.